Laced Tundra part 1

I wanted to build my son a true Shred The Ledge style truck. So I dialed up my good friend Bert Melchner. Bert has been producing some of the nicest cages and builds on the east coast, so I turned to him for this task of creating a chassis to work with. 

After a few conversations, the ball was rolling, we decided, no brainer, that we’d use the latest CBE RC FAB switchback chassis, the ultra. Bert and I decided on a full truggy style build with the Tamiya Tundra being the body of choice.

After a few short weeks, I had the chassis in my hands. The chassis work was perfect, and the welds looked good, and the bars and rails were straight! Bert of A&M Garage (named after his kids) out did himself, and handed over a fine piece of equipment!


I decided that the perfect skid for this build would be the TJ RC Products flat SCX10 skid. This skid is made of a tough delrin, and is ready for any abuse you throw at it. I have this skid on a few of my RC builds already. 

Up next was converting most of my SCX10.2 over to the Laced Tundra. I took the new 3D printed front CMS/Battery mount in one from Bowhouse RC and planted that right up front. I had to trim a little off the mounts to get it to fit the narrower front end. Zip zip, and donec, Fit perfectly.


I installed the SCX10.2 front shock towers on with no issue with my favorite Boom Racing shocks the Type I 90mm. I stuffed them full of Pitbull Tires shock oil; 33wt. Under neath it all are the new Boom Racing Phat SCX10.2 axles. These will add some extra weight as well as some durability. 

I gave the transmission a refresh in bearings and grease as well as a HD motor mount. The transmission remain mirrored and flipped for this build. As always A Holmes Hobbies motor found it’s way into to the build, a Crawl Master 13t.


With Phat Axle’s all round, type I’s at each corner, this build is taking shape. As well as with all my other RC’s I use Team KNK Hardware monster bag, spacers and locknuts to secure everything down and held into place. 

That really as far as I got for tonight, but tomorrow night, we’ll get more done, if not finished!! Thanks for reading along, 

Return of the Goat/ Chassis work.

I decided to get started on the chassis so I can get the interior started for the Escalade. I devided to bring back the RC4WD R2 transmission that I started the OG Goat with. 

I started with using a blank TJ RC Products Skid. I wanted a flat skid, and a place to throw the transfer case on. The skid is to thick for the SCX10 chassis, so the dremel tool came out, and cut out the bottom plates off the rails. 

TJ RC Products high clearance skid.


After I got the skid fitted I moved to the front. I had to do what I did last time for the R2 trans. I cut out the notches of the frame rails so they would sit flush on the R2. This does weaken the frame rails, but I have run this set up hard before and haven’t had any issues. 

Making room for the bulky R2.


R2 bolted into it’s new home.


After I got the whole thing set up, I threw the front axle back on, and got the shock towers on with some spacers. These are temporarily on there until I decide what to do for the front suspension. This is all mocked up, and I will change the 3-link to a 4-link when it’s go time. 

I have it all set-up and I’m ready to get into the next thing. I need to attach the transfer case to the skid next time I’m in the shop. Making some head way on The Goat, and loving it so far. 


Return of the Goat. 

It’s about dang time I start building RC’s again! I’m starting with bringing back a legend in my world, affectionly known as The Goat. I am using fresh new Escalade Hardbody, and will start getting more and more done with it. 

The Goat before the cutting begins.


I started with cutting the ABS plastic out of the molded windows. I decided to cut out all 4 door windows, as well as the windshield. 

Cutting out big sections.


I cut the plastic with some distance between the door frame and where the side view mirror goes. I do this so I don’t cut too much off or into the frame of the door. I then use a dremel with a small sanding drum to get closer to the door frame. Then I finesse the doors with the smallest sanding drum and get them to almost perfect. 

Window frames 90% done.

While I have the grinding wheel out, I also have to remove the old mounting posts to make room for all the new plastic windows or anything else I need a flush mounting spot for. Removing a lot of plastic takes time and patience, which I suck at with both. 

I also use a small exacto saw blade to get the posts off.


So, a small start, but a tedious one that takes a lot of time. I need to clean up the windshield, and sand out the door frames with some 150 grit sand paper and move on to the interior. 

The Goat is started, and I am Pumped! 

Over-Saturation, or Progression?

We see it almost every week, someone new comes out with something old, or so it seems. These people that are trying to cut into a market that has already seen enough chassis to choke a small army. Everyone wants a piece of the pie, wants to leave a mark, wants to put their own twist on an already flooded market. 

To some this is a bad thing, to others this is a great thing, and some just don’t care, they’ll use whatever they want. Some say the stock chassis are good, and they aren’t wrong. Some say these new chassis are basic, and they aren’t wrong, while others love the new aspects of all these new chassis. These newer chassis incorporate things many builders and drivers are looking for. Some are made for super scale RC’s, while some are built for comps, while others are made to be built anyway you want. 

I hear it all over social media, people complaining about someone putting out a new chassis and why do we need another new chassis. I saw one post go in an ugly direction over it, and it was sad to watch fellow rc’ers tear this guy apart for even thinking of doing his own. 

Why? Why can’t we as a collective hobby have more options? Is it so bad that people want to push the hobby forward? Try their hand in making something people may actually want? Should we just be stale and use only what the popular companies produce? Why can’t we? I want to build a comp RC, and the stock chassis will work, but why can’t I build a comp rig with a chassis specifically made for comps? 

Yes, I can agree that cookie cutter chassis that have one minuet change or an extra hole drilled into the chassis from another is borderline unacceptable. I’m talking about the ones that are really unique from the other, someone spent time and testing in their idea, so they have a place in our hobby, and fill in a void that was actually missing; chassis choices. 

This thought process can also be applied else where, you know where I’m going.. tires… why do we need more tires, and tire companies? We should all use the tires made for this hobby from Tamiya from the 70’s. Why do we have so many options? Progression is why. We built trucks that out preformed the tires, so tire companies had to step up, make new tires that fit the driving styles and builds for us all. This why we all have bragging rights as to what tire works best, with no clear winner. The same mindset can be added to all aspects, why new motors, new bearings, electronics, etc, we are over-saturated at almost every point of RC.

Progression only pushes the hobby forward. Over-Saturation can happen, and when it dries up, what’s left is the solid and quality products we’ve come to know and love. I personally love what people put out there, even if it isn’t anything I would use. They are trying and who am I to dump on their parade and ideas? I will support these ideas, these concepts, as they are just more doors to be opened to lead us into something big, unique, and fun. If we continue to choke out the ingenuity and fun of this hobby, it will surely fail. 

Just remember, we all have a place in the RC community, whether you’re a driver, builder, promoter, designer, painter, electronics genius, owner of a company, run a competition, or are just here for the fun, no one is better than the other, and instead of tearing people down, how about we try to build them up and support them. We can be the example to many others, and who knows, maybe that guy/gal has a million dollar idea we all want! 

#yearofthesleepinggiant #progression #sharethefun #sharethetrails #sharethehobby #newbreed

Switchback Chassis Year end review. 

Switchback chassis year review.
I have finally had a few moments to sit and review this two planker chassis from CBE RC FAB. I have the 1st gen version of the switchback, and I had one hell of a year with it. There’s something to be said about having something for a year, and to use it that long that isn’t attached to our hands with a screen and facebook on it. 

I started off the year with deciding to dedicate the switchback chassis to the grueling run of the 48 Hour Challenge event we run on Memorial Day weekend every year. The build went together with minor issues, and was ready for the 48 Hours. 

48 Hour Set up –
CBE RC FAB:

Switchback Chassis

Shock Gear Set

Titan Winch

STL Winch

Rock Biter bead locks

BPC:

Battery Tray, Motor Guard

Boom Racing:

Phat axle front with Aluminum knuckles and C-hubs and a rear phat axle with aluminum lockouts, one piece aluminum links, Type I shocks, Aluminum Transmission case, pineapple steel gears, Krait wheels.

Holmes Hobbies:

13t Crawl Master
Pitbull:

Rock Beast

33wt Shock oil
Scalerfab.com:

Pro Series style stinger
Powershift RC Technologies:

Front Light buckets, rear lights, rock lights, 

The Switchback last the 48 Hour challenge like nothing. It faced a plethora of weather including a downpour for about 30 mins straight. 

Up Next was the RCEC Mini Tour. Two days of hard wheeling from MA to NH. Same set up as above. We climbed big rocks, and found some mud to play in. We ran the course at Route 106 on Sunday and had a blast doing that!

Up next was the PA Shred The Ledge where Anthony Kaplon took her as a rental, and treated her as such. The rocks were big, the tumbles were mighty and the driveshafts snapped with the new grip of the Pitbull Rock Beast XL’s. The only change to the Jeep was a new set of 0 degree steering knuckles from Boom Racing. The Switchback Chassis made it through with no issues.

Last on the big list of duties was Shred The Ledge at Field and Forest behind the wheel of my Daughter Chloe-Mae. She had never rc’d longer than 2 mins ever, and took on the toughest course in RC. I changed a few things on the Jeep, and here they are.

Boom Racing:

PHAT XR MOD Axle
Pitbull:

Mad beasts
Powershit RC Technologies:

Wireless winch remote

In a full year of abuse the CBE RC FAB Switchback chassis held strong, and true. With the steel axles underneath the chassis, the holes never bored out, and the rails remained straight and true. They came to me raw, so they are covered in surface rust and is perfect for what I’ll be doing next with it. I am a huge fan of this chassis, and the options that come with this builders chassis are limitless. 

If you’re looking for a beast chassis then look no further than the Switchback Chassis. It is battle tested, and is under many RC’s you see out there. There are only a few chassis on the market that I support and use, with CBE RC FAB’s Switchback Chassis being at the top of that list.

Hello Komodo

KOMODO Review –
So as luck would have it, I have in my possession, not one but two Gmade Komodo kits. One RTR, and one half built. I have wanted one of these RC’s for a while now, and I have two. Today I’m going to dive into first looks, and first run.

When I look at the Komodo I am impressed first off with the body, and the attention to scale detail. Gmade provides you with most scale items you’d find on a weekend warrior, mild trail truck. All ABS style plastic scale parts, as the body is a thick lexan mold. The frame is chrome, and shiny, not my favorite, but what can you do? The axles are light, and smaller than your SCX10 axle housings which is a benefit to wheelers that drive on big rocks. The links are short, but provide ample articulation for such a short set up. The wheel base is about 11″ from center hub to center hub.   

The electronics box is a great scale idea looking like an engine. There’s an enclosure to keep dirt and dust off you RX, and a platform to mount your ESC. The back has two braces and reusable zip ties to hold your battery into place. The drive shafts are that plastic you’ve come to know very well, and look like they maybe the first upgrade in my opinion. The transmission is all enclosed with plastic gears, with out an option for metal ones, this maybe the breaking point of this RC.
 
So, with both Komodo’s the shocks that came with the Komodo kit were swiped, and stock Axial shocks and RC4WD Kings were left on the frames, so I can not tell you about how good the Komodo stock shocks are or not. The stock tires and wheels came with one kit and none on the other. I have not used the stock tires or wheels as I write this, as they are sitting on the bench under another project. I decided to use the best stock set-up I had to give the Komodo a true honest review. I prefer to have traction, so I threw on my favorite Pitbull tires the Rock Beasts wrapped around Boom Racing’s Krait wheels.
 
For electronics I used the Axial AE-5 and my Spektrum. I charged up my 3S 2200 and headed to my wheeling spot at Hard’ack. At first first pull I knew I had a little speedster on my hands. She snapped the left front tire up, and I sighed as I knew I was in for a long day of learning how to drive with extreme torque twist again. I didn’t let it bother me to much, as I jumped the Komodo off the rocks and dirt mounds, and watching it launch with ease made me smile. I tooled around some of the usual spots and watched it struggle where I normally crawl right up. I had a few spots I wanted to hit to see how it faired in a wheelers play ground. 
  
I had some fun trying to get that long Ford body through the steep spots as the bed dug holes where you normally don’t deal with on a wheeler. Once I learned how to drive with a big body, lots of power, and torque twist I found myself smiling, as this little Komodo impressed me more and more. I was climbing spots very well, getting through area’s I shouldn’t have been able to go through. I think the extra horses may have helped with that! But alas, it was those same horses that ended my first run with a stripped gear. Whoomp whoomp. 
I have a list of upgrades that Gmade makes for the Komodo and will get them as soon as I can. I also will be trying the transmission flip to get the motor up front rather than in the rear to help eliminate the torque twist. It really is worse than any other rc’s I have wheeled. The only down fall that I have seen, and possible draw back is there are no metal transmission gears…. So, we shall see.   

First impressions are this is a cool, and stable rc! On a scale adventure rig I’d give it an 8.5 with a combination of scale appeal, rock solid performance on mild trails, and fun factor is why I give it a higher rating. 
For wheelers I give it a solid 4.5, it would be a 5 but not even a full battery and it stripped a gear. 
My plans are simple, take this adventure scale style rc and turn it into a capable wheeling machine. A few subtle changes and I think this Gmade Komodo can be a force on the big boy terrain. That is all based on hoping the transmission can handle the abuse. If not, another makers transmission may find it’s way onto this RC. 
Overall rating is a 6.5 I would recommend the G-Made Komodo to any RC’er beginner to vetran wheelers. I feel there is a ton of potential with the Komodo, and plan on proving that this summer! I’ll be posting updates and more reviews in the coming months. 


Boom Racing’s Knuckle Conversion.

Hey gang!! Well, it’s very rare that I blog about a part, or parts, but I feel that is going to change! I have a new product that I was excited to try out, loved the results, and decided it was blog worthy!

Boom Racing has delivered on a product that I think everyone needs to take a look at! I was trolling their website when I saw this little no big deal picture of some funny looking hubs, and links. I clicked on the description and all it said was, Front Hub Conversion for SCX10. So, I said. Well, that looks like it may be a sweet setup and may give me more steering. In the cart it went, a week later it arrived at my door step!


Boom Racing’s C-Hub Comversion

 
As you can see in the picture, I am attaching these new knuckles to my PHAT axle and aluminum C-Hubs. The install was harmless, as most are, and went together without an issue. The links, ball ends, all fit perfectly. I had them mounted up and ready for servo hook up in less than twenty minutes.

Oh, she can steer alright

Up next was installing the wheels and tires. I chose to use the new Krait Sandstones’s for this build, and Pitbull RCX Rock Beasts. “Smaller tires make better drivers” – Desmond Mooney 

One thing you want to remember is that the new knuckle arms are straight out, so your tire may rub the rodennds. To help offset that rubbing; using a wider hex hub may be on the list of needs. Check Traxxas, Axial, Boom, KNK Hardware, for some wider hexes.

Here below in this picture is the Boom Racing Knuckle Conversion, and the coveted XRMOD. The steering angles are close with XRMOD edging out with a full spring to spring touch, while Boom’s is just a touch shy of the full spring to spring touch.  Plus, the XRMOD has many more advantages than most steering set ups. 

Boom conversion on left, XRMOD on the right.

First impressions are everything with me.If anything these new Boom Racing Knuckles do, is help over stock steering and for a great price. I have used these hard, and at one competition already and they have not failed me yet. I am very happy and would recommend them to anyone looking for a budget benfit steering up grade! 

48 Hour Challenge part 2

Second update coming to you from the Vermont Scale RC Studio!!! Progress?? I think so!! I have been slacking hard this month, but with a new shipment of parts, I have been forced into build mode!

There have been a few changes, and with that comes new challenges! The best part of building a custom chassis, is figuring out where everything will go, and how it will all work.


With the CBE RC FAB Switchback chassis and Shock Gear towers on, and Boom Racing Transmission in and the Holmes Hobbies 13t Crawl Master bolted up, we move onto hanging the axles. 

For this years 48 Hour Challenge I decided to use some new products and see how they hold up to 48 Hours of constant abuse. I decided to use the PHAT™ axles from Boom Racing. Weighing in at 180grams, these steel axles will give me a forced COG. I am making this build a belly dragger, and to have a high center of gravity is a no go. 

  
For suspension I decided to run 90mm & 100mm Type I shocks from Boom Racing as well. I have used this shock setup once on another build and it has served well on the trails of Vermont and the Griptastic rocks in Nevada. I’m not 100% sure why this set up works well for my driving style, but it just seems to work well for me. 

We have the ride height set, and the shocks are exactly where I want them. The CBE RC FAB shockgear towers just rule the tune-ability factor! Digging them a lot, and I like that I can easly get to them to change shock postion if need be. 


Up next is battery the battery plate. With all the options on locations from the Switchback Chassis I was able to mount my battery in a place I normally couldn’t. I actually dig this spot a lot. Keeps the balance centered, and low. The BPC battery mount is my favorite by far and is staple piece in all my RC’s. All I did was mount the tabs from the plate too the top of the integrated link risers on thr chassis! Easiest mount to date!  

 
In the next install, we cover body, lights, and accesories!! The 48 Hour Jeep is coming together and ready for some action!

454

I wrote this in 2010, and thought I’d share it with you all .


454

I can tell you to the day to the time to the year why 454 is such a significant part of my life. It brings me to a moment in time where my father and I enjoyed a common interest and a love for machines, horse power, and we got along.

My father and I didn’t have a lot in common when I was younger. I mean we watched some football a little bit of racing and that was it.  He was from the old school and I wanted no part of it. Stubborn should have been his name, to this day he still holds that line. Though as miserable as his moods can be, he was always there for me, no matter what. As I write more and more I recover more memories of my father, good memories. Dad always made time for us, whether it be for practicing for baseball, taking us swimming at Metcalf pond, keeping us outdoors with fishing and hunting, playing with us or making us warm chocolate pudding on random nights. My father was the ONLY one that wrote to me once a week when I was sent away to Job Corps for 2 years at 16, but, that’s another story all together.

When I was living with my mom, dad would try and keep me involved in his life and keep me out of my mother’s hair for her sake. He always brought me to the Johnson Mud Boggs (JMB). This truly was the one thing I enjoyed doing with my father. There were no stupid questions, there was no stress, and we had a good time. The very humble beginnings of the JMB were amazing. Just a bunch of good ole boys and girls hanging around the mud pit in the middle of a corn field watching the competitors try there best to trudge their way through the 150ft pit of quagmire. There were some real intense moments of watching these trucks claw their way through the mud. Very few made it through, an occasional big tired high horse powered truck would make it through. This was an event one should truly witness first hand, up close and personal.

So the ensuing years at JMB changed, I can remember the first year they put up the fence. Just a bunch of telephone posts sticking up out of the ground about 4ft. This was our new place to watch the trucks. We were now about 20-25 yards from the actual mud pit up on a bank. This year there were some other changes as well. The truck-pits area where the competitors conveyed was across the mud pit parallel to the bank we sat on. It was a wall of RVs and tents. You really couldn’t see any of the trucks like you used to. The one thing that didn’t change was the mud pit. The pit was still an unruly slop pile for these trucks. We watched the competitors go as hard and as fast as they could. Try as they might they couldn’t make it through the pit. One by one they got the chain attached to the bulldozer and dragged out. It was getting a little stale; it looked like no truck was able to claw there way through the big mud hole. Some made valiant efforts with some high-speed attacks and earth throwing tires.

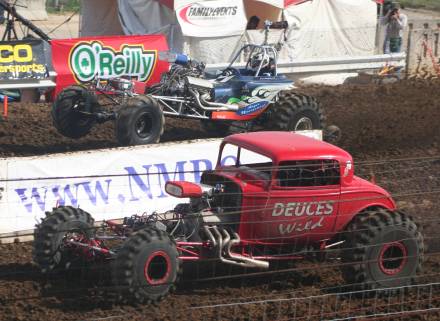
I hear a mumbling over the crowd as the announcer started talking over the loud speakers excitedly. My father leans over to me, slaps my head playfully as he was sitting behind me and says, “Get ready.” “Ok.” I replied goofily. I was not really paying attention, I do that a lot according to my father. The announcer was saying some kind of gibberish over the loud speakers, and then I heard it. WHOOM! Rumble, rumble, rumble, WHOOM! Echoed through the air of the field we all sat in. My eyes grew wide with curiosity. I’ve heard some loud trucks, but never like this. “What is that?” I ask excitedly to my father. He replies with a cool smirk, “You’ll see.” WHOOM! Rumble, rumble, rumble, WHOOM! Rumble, rumble, rumble, as it coasted through the pit area. I couldn’t see it, I could only hear it and see the dust clouds it caused as it drove through the pits. WHOOM! Rumble, rumble, rumble. My anticipation level was rising with every sound of that engine. WHOOM! Rumble, rumble, rumble. I was shaking now I was so excited, I couldn’t wait to see that truck, and the excitement was almost too much for me. I was 16 and I never got goose bumps and chills like this. What is it?! I knew my father was getting excited as he slapped me on the back with a hoot. WHOOM! WHOOM! WHOOM! Around the corner she came, WHOOM! As she announced her presence, the crowd responded with a thundering howl! This truck was beautiful, Candy Apple Red 32’ Ford Deuce Coupe body, chrome pipes coming off the side of the engine, exhaust flying out of the pipes, WHOOM! She stated with authority. I have never seen anything like it before, it looked like a drag racer with paddle tires. The rig affectionately named “Deuces Wild” came to the staging line, WHOOM!! WHOOM!! You could not hear the announcer over the noise of this truck and the screaming from the crowd. My fathers screaming at me, “Don’t blink Trevor, Don’t blink!” “Why?” I said to myself? I wasn’t going to blink either way. WHOOM! WHOOM! Rumble, rumble, rumble, as she cleaned out the carburetor. The flag man called her up to the line, WHOOM! WHOOM! Rumble, rumble, rumble. She was set and ready to go. What was this truck going to do, it’s going to be bad ass either way! The flag goes up, and like slow motion in a movie he dropped the flag.

I honestly can’t put into perfect words as to what happened next. That truck took off like a rocket! WHOOOOOOMMMMMMM! WHOOM! Rumble, rumble, rumble rumble, rumble, rumble, WHOOM!! The pass was done!? Deuces Wild was through to the other side in seconds. My first words were “HOLY SHIT!” (Which I’m not sure my father heard.) As the whole crowd went ballistic! I looked at my father with disbelief on my face and that fool was on the ground laughing his ass off. “That was amazing!” I screamed over the crowd at him. He just shook his head in agreement while laughing. Rumble, rumble, rumble as Deuces Wild went back to the pit with her head held high. Not a spot of mud was on that truck, just the rear tires, the front ones were not even on the ground. As the crowd settled back down into a low roar the announcer came over the big speaker and said, “Did you see that? What just happened?” The announcer went on to tell us that Deuces Wild just set a new world record with that run. 3.2 seconds in 150ft of mud. Everyone screamed at her success in Vermont. We had claim to the title for awhile anyway. I return my attention to my father, he had a big ole grin on his face and I say to him, “What was that?” He replied with a glisten in his eyes, “That was a 454 big block with some serious motivation.” I just shook my head with uncertainty as to what a 454 big block was. He explained to me that it’s one of the biggest Chevy engines ever made and they were made to haul ass. I smiled at that, I told him someday I will have a 454 in my Chevy.

I guess on that day I looked up to my dad in a new way. Like a friend I guess, we were able to just talk and there was no awkwardness. The rest of the day he explained to me about all these new types of mud trucks that were there. He brought me down to the pits and we got to see some of the big trucks. Took some pictures and met some of the drivers. It was an amazing time. One I will always remember. The year they cancelled the JMB broke my heart on so many levels. That great bonding experience I had every summer with my dad was gone. All the conversations, friendship and goofing off we did were going to suffer greatly. I knew what was going to happen next. We would grow apart, I would become disinterested in spending time with him or any family member for that matter and want to spend more time with my friends. Now as an adult, I find myself reliving all the good times I had with my dad through writing. I will sit hear and type while I’m crying, laughing or getting mad and all the nice emotional releases that come with writing. This will be the first time I will let any of my family members read anything I write. It’s a start and maybe I will open up a little more and let some more family in.

In closing I want to thank you dad, Calvin (Butch) Norris Rushford for giving me life and freedom. You may have had a hard time with me growing up, you taught me valuable lessons that I use for my kids today that I didn’t see until I got older. You were firm and impossible at times, we may not have seen eye to eye, ever, but you are my father and I love you.

Ps Thanks for all the great times in the mud, be it in Johnson, Essex, hunting or trips in your old Jeeps. My heart lies in off-roading because of you. Love ya dad.


DW1

48 Hour Challenge Build part 1

It’s that time of the year where I start my build for the 48 Hour Challenge. Last year’s 48 Hour Challenge we used Axial Racing’s CRC JK Jeeps. These Jeeps were bone stoack, minus a few changes, like Pitbull Tires, battery relocation, and Team KNK Hardware. Some waterproofing and winches were added, and we went for it. We succeeded and so did the Jeeps. 

  
This year is a little different, and we are building new rigs, and some are bringing bone stock rigs. There were four drivers last year, this year, who knows!! 

This build series I’m doing is going to be the accumulation of past experince and new build setups. 48 Hours give’s you a long time to know what works, what needs to be changed, and what is total garbage. So, I am using some staple sturdy products, and trying some new stuff. I will start with the chassis, and start from there.

This years platform is based of CBE RC FAB, chassis called Switchback. I wanted to use this chassis for a few different reasons. The tuneability in this chassis is huge. It has tons of options for the builder in you. It can be used for the wroncho style builds, stocker, class 1, modified; so many options.

Switchback V1

This is the first version of the Switchback I am building off of, version two is almost released as of this writing. As you can see the chassis has a ton of tunibility and options for your building needs.

I also required some of CBE RC FAB’s newest release of shock towers. These new designs which I call – Ritz men – are beefy, big, and ready for real work. These towers are also made for tons of adjustability.  


With everything coming together fairly easily, I decided to make things a tad more difficult by adding a front motor/transmission mount design. I selected the R2 Transmission from RC4WD for these duties. I’m not 100% if these transmissions are capable of withstanding 48 Hours of abuse, but I am going for it. The R2 transmission bolted perfectly to the Switchback   chassis, and I was able to mount the shock towers right into the transmission too.  


RC4WD R2 mounted to the front.


The rear shock towers by CBE RC FAB.


So, with last year in mind, and remembering that the plastic was getting fatigued by the end of the 48 hours, I decided to go with metal links, 12.3″ solid one piece links to be exact from Boom Racing. The links are on their way. I like the one piece design for long runs, as rod ends and plastic wear down and may make the days longer by having to fix them. One piece, bolt up, and forget. 

I also have to have serious sturdy armor for the old Jeep body. So I went with ScalerFab’s pro series bumper. I am a fan of these bumpers, and how well they are built and how strong they are. 

Scalerfab.com pro series bumper

This is as far as I have gotten on this build. Waiting on some parts and pieces to get the next wave of building underway. Thank you for reading and following, and we’ll see you on the trails!

Wheels down, throttle open,
Trevor